


Bondtech Raise3D Pro2 Hotend Upgrade Kit - High Performance Extruder Replacement for Raise3D Pro2 3D Printer - Perfect for Professional Printing, Rapid Prototyping & Industrial Applications
Free shipping on all orders over $50
7-15 days international
11 people viewing this product right now!
30-day free returns
Secure checkout
47177990


Description
Your Raise3D Pro2 is failing on those big PLA prints you bought it for?
We have the fix.
The Raise3D Pro2 can actually be a very good 3D printer if you use this.
Bondtech Hotend Fix for Raise3D Pro2 Advantages
- Affordable with a great value for cost;
- Heat creep is minimized by Copperhead’s thermal performance;
- Better layer bonding from the Bondtech CHT nozzles…
- … and higher flow with PLA and other non-abrasive materials;
- Compatible with RepRap nozzles;
- Easy and quick to install process…
- … that includes a gauging tool to achieve optimal hotend setup.
Why Was The Bondtech Hotend Fix for Raise3D Pro2 Created
Many users contact us to buy extruder upgrades for the Raise3D Pro2.
These frequently repeated reports were evaluated by our Engineering team.
We found out most issues reported come from the hotend, not from the extruder.
The Raise3D Pro2 has a serious heat creep problem.
Print jobs using low Glass Transition Temperature materials are the most affected.
The longer PLA or TPU prints go over 2 hours, the higher the probability of failing due to under-extrusion or even clogging. Prints fail, or the parts made are very fragile.
For this serious problem we designed a simple and effective solution.
- The solution's core is the Copperhead Heat Break, that enhances heat dissipation and separates hot and cold side of the heat break more effectively;
- A new heat block was designed and machined by Bondtech to provide compatibility with the stock heaters, thermistors and silicone socks while enabling the Copperhead heat breaks and wide standard RepRap nozzles;
- To wrap it up, a pair of Bondtech CHT nozzles increase the flow capacity and improve layer adhesion, or enable the possibility of running the nozzles at lower temperatures.
This Set Includes
- 2x Copperhead Bi-metallic Standard G2 Heat-break
- 2x Bondtech Coated Brass CHT 0.4 Nozzle
- 2x Raise3D Hotblock Pro by Bondtech
- 8x M3x3 set screw
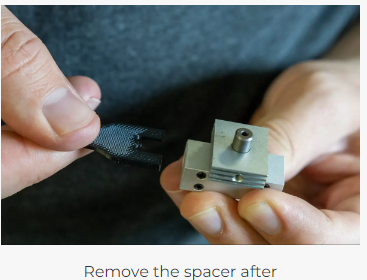
- 1x Spacer for Raise3D Hotblock Pro
SETUP GUIDE
The whole process is divided into 3 stages. Click each tab below
to reveal the steps on each stage. This guide assumes you know how to operate the Pro2. If you don't, please refer to Raise3D Pro2's Documentation.
When we illustrate how to execute a step on extruder 1, the same procedure needs to be mirrored on extruder 2.
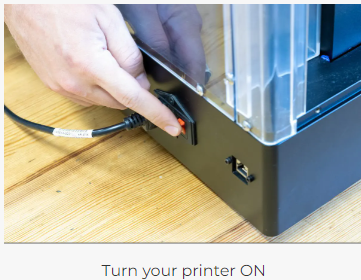
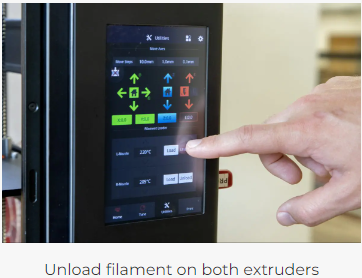
1/3 Disassembly
Step 1. Unload Filament

Step 2. Remove Fan Shrouds


Step 3. Release The Heaters And Thermistors


Step 4. Remove The Hotends


Step 5. Separate The Heatsinks


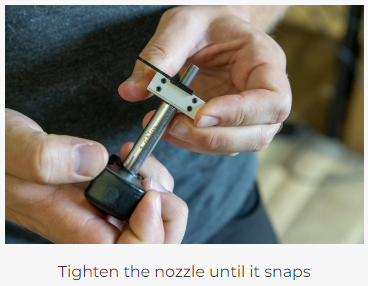
2/3 Assembly
Step 1. Prepare The Hotend Fix For Installation


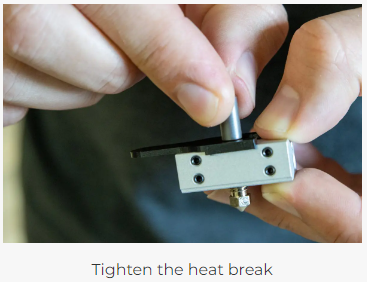
Step 2. Cold Tighten The Nozzle


Step 3. Apply The Heat Sink To The Hotend Fix


Step 4. Insert Heater and Thermistor


Step 5. Install The Hotend Onto The Extruder


USING SILICONE SOCKS
Using the Hotend Fix with a silicone sock is more stable and leads to better performance. Still, you have the choice not to use them.
Case you do or you don't, perform a new PID tunning to improve the thermal reaction of the heaters and thermistors.
Case you want to use them, after inserting the first hotend is the time to apply the silicone sock to extruder 1. After placing extruder 2, it gets too tight to add the silicone socks later.
1. Install the silicone socks before placing the 2nd hotend.
2. Both Hotend Fixes are installed without silicone sock, leaving no space to add them later.

3/3 Pre-Flight Check
Step 1. Hot Tighten The Nozzles


Step 2. Z-offset Re-adjustment


Step 3. PID Tunning
Either you will use the Silicone socks or not, before starting using the Pro2, perform a PID tunning on both hotends.


